Transferência de ficheiros
THIS PAGE IS DEPRECATED: READ File transfer
Como é que o usamos?
Android
Quando está a falar com alguém no Android, tem a possibilidade de enviar uma fotografia no seu dispositivo ou de tirar uma fotografia com estes botões:

Nota
When you send a file, the other has to accept it. At this moment you will see “awaiting peer”:

Como é que funciona? (técnico)
Como funciona
Introdução
O Jami é uma aplicação distribuída e tem de funcionar sem qualquer conexão à Internet. Por isso, a transferência de ficheiros também! Basicamente, utilizamos o mesmo método para efetuar a transferência de ficheiros e chamadas, mas em TCP. Para resumir como funciona, podemos imaginar uma situação em que Alice (A) quer transferir um ficheiro para Bob (B).
First, Alice will request a connection to Bob. To do that, Jami is using ICE (RFC 6544), a protocol used to negotiate links between peers. Alice will send, into an encrypted packet via the DHT the IP address of its device. So, when Bob receives the IP addresses of Alice, they will be able to negotiate a transport where Bob will be able to send packets to Alice. The negotiation can be successful, but if it fails, a TURN server will be used (the one configured into the settings) to perform the transfer. If the negotiation succeeds, Bob will send its IP addresses to Alice to perform the negotiation in the other direction. Note that the link is still not secure, so Bob will send the IP addresses through the DHT network in an encrypted message. If the second negotiation fails, the TURN will be used as a fallback.
Agora que a ligação TCP bidirecional está aqui, o próximo passo será negociar um TLS 1.3 (geralmente um (TLS1.3)-(DHE-FFDHE8192)-(RSA-PSS-RSAE-SHA384)-(AES-256-GCM) quando escrevo estas linhas) entre a Alice e o Bob, e depois a Alice começará a transferir o ficheiro.
A primeira parte será um pequeno cabeçalho para descrever o conteúdo do ficheiro. Depois, quando o Bob aceitar a transferência, será transmitido o ficheiro completo.
Processo
Enviar um ficheiro
É utilizado o seguinte método:
A client will call
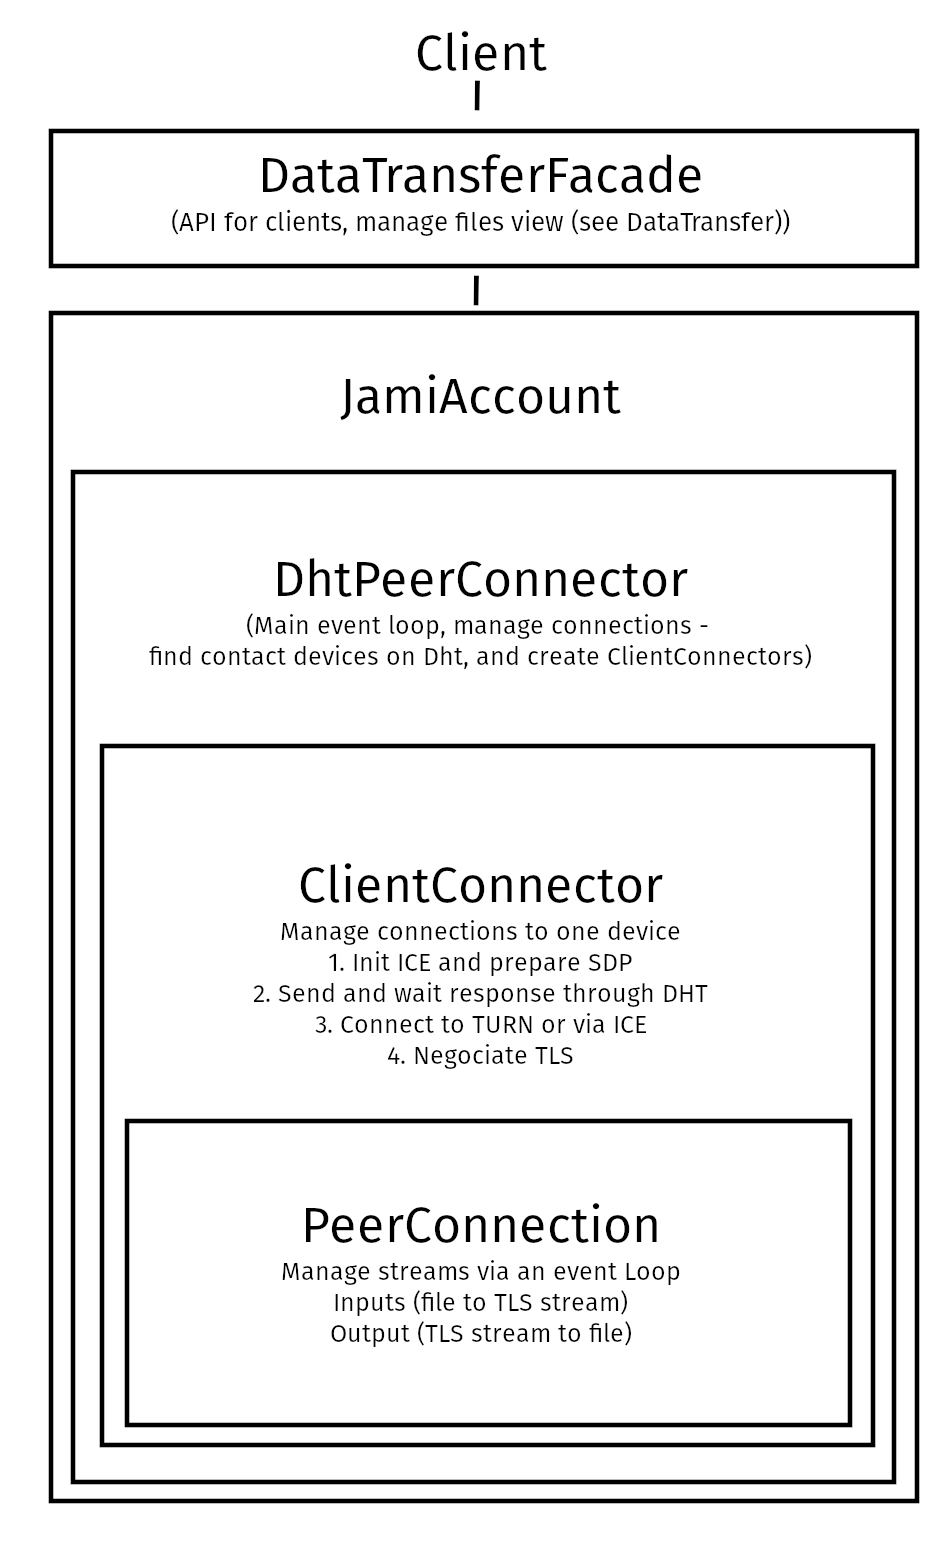
DataTransferFacade::sendFile().DataTransferFacadeis the class corresponding to the API exposed for the clients. It is used to manage a view of the file transfers (the corresponding classes areDataTransfer,IncomingFileTransfer,OutgoingFileTransferandSubOutgoingFileTransfer). This method will ask the linkedJamiAccountto request a connection.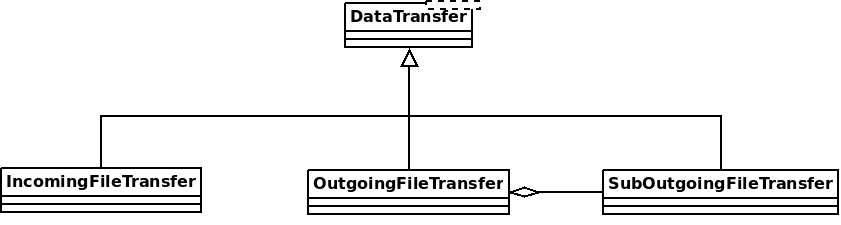
The method
DhtPeerConnector: requestConnection()is triggered and creates a connection between all connected devices of the peer (found on the DHT).DhtPeerConnectoris used to manage the main event loop which manage connections. When a device is found, the event loop will create aClientConnector(which manage the connection for one device) and launch theprocess()method.This method is used to initialize the ICE transport and put a PeerConnectionMsg (which contains the SDP message, see below) on the DHT and waits for a response (
DhtPeerConnector::Impl::onResponseMsg).Then a response is received from the DHT, which contains public addresses of the peer device. We can now negotiate a TLS link (directly via ICE, or via TURN as a fallback). This
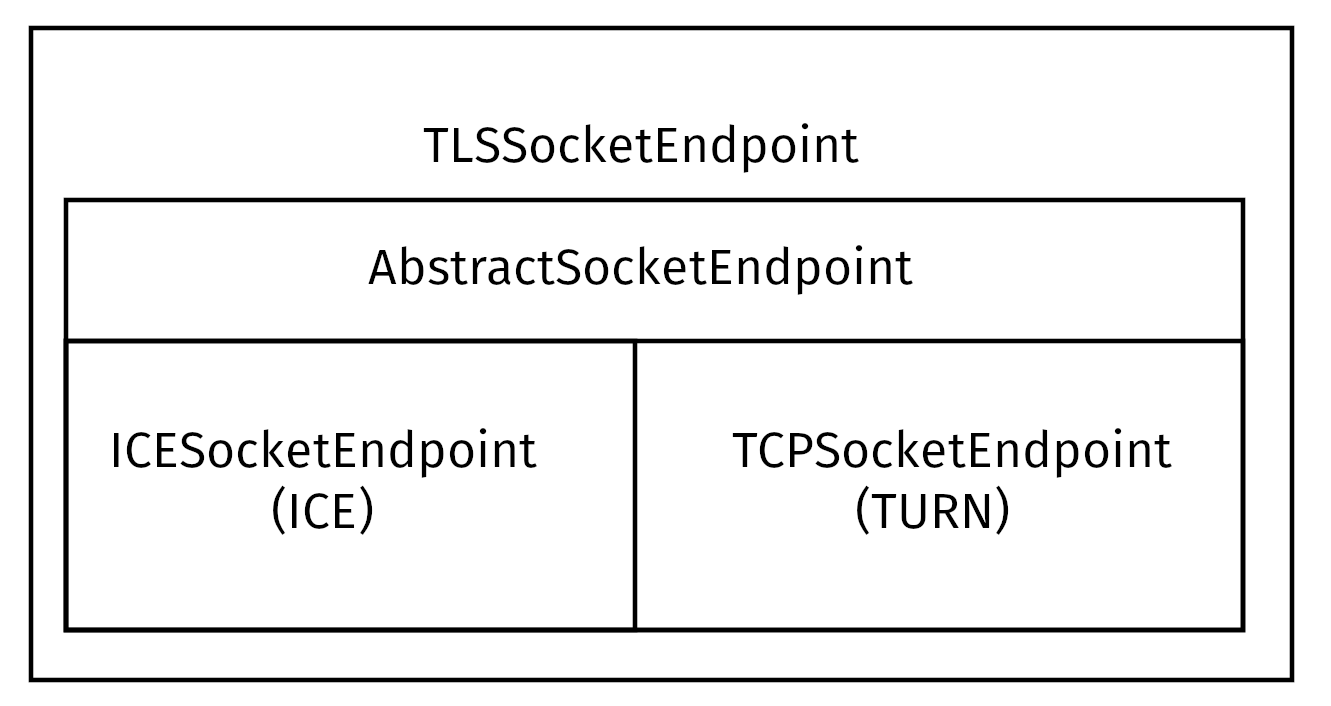
TlsSocketEndpointis given to thePeerConnectionobject as an output and the transfer can start.When the TLS socket is ready, the callback
DataTransferFacade::Impl::onConnectionRequestReplyis called, and aOutgoingFileTransferis linked to thePeerConnectionas an input. ThisOutgoingFileTransfercontains a list ofSubOutgoingFileTransfer(one per device) where each sub transfer is a transfer to one device. We do that to be able to furnish the most optimistic view of the transfer (if a contact as 3 devices, where the contact cancel the transfer on one device, but accepted the transfer on the two others, the most advanced transfer will be shown).The
SubOutgoingFileTransferwill first transfer the header of the file, wait the peer acceptance (A «GO\n» message on the socket) and then will send the file.If a cancel is received from the peer or the client or if the file transfer finish, the connection will be closed via a
CANCELmessage on theDhtPeerConnector::eventLoop()and the resources will be released.
Receber um ficheiro
A mesma estrutura é utilizada para receber ficheiros, mas o método muda um pouco:
A classe
JamiAccounté utilizada para receber mensagens do DHT, pois a primeira coisa recebida será a requisição do DHT.Em seguida, esta mensagem é enviada para
DhtPeerConnector: onRequestMessage()através do eventLoop.O método
DhtPeerConnector::Impl::answerToRequesttentará ligar-se ao servidor TURN (se não estiver ligado) e inicializar o transporte ICE. Este método abre 2 ligações de controlo a um servidor TURN (uma para autorizar pares IPv4, outra para pares IPv6, devido à RFC 6156) se ainda não estiver aberta e permite a ligação de endereços públicos pares. Depois, se o SDP recebido não contiver candidatos a ICE, usará o TURN e elaborará a resposta SDP para aguardar o par. Se o SDP contiver candidatos ICE, o método tentará negociar a ligação (ou recorrer ao TURN) e responderá ao SDP (com candidatos ICE ou não).Uma vez que os links estão prontos, como o remetente, um link TLS é negociado e dado ao
PeerConnectiondado aoIncomingFileTransfercomo uma entrada. Os cabeçalhos do ficheiro chegam e o cliente pode agora aceitar ou cancelar a transferência.
Voltar a pedir uma transferência de ficheiros anterior
As specified in Other mime types, the data-transfer interactions are now synced and stored into conversations. So, a device can easily detects if a file was downloaded or not. If not, it can asks all members in the conversation to transmits the file again.
Para fazer isso, o dispositivo enviará um json com o mime-type: application/data-transfer-request+json contendo conversation (o id da conversa), interaction (a interação relacionada), deviceId o dispositivo que recebe o ficheiro.
O remetente verifica agora se o dispositivo é um dispositivo do par anunciado e se o dispositivo é um membro da conversa, e pode enviar o ficheiro através de uma transferência de ficheiros clássica.
O recetor pode agora aceitar a primeira transferência de entrada, descarregar o ficheiro e verificar se o sha3sum está correto.
Esquema
SDP enviado através do DHT
0d04b932
7c33834e7cf944bf0e367b47
H6e6ca682 1 TCP 2130706431 2607:fad8:4:6:9eb6:d0ff:dead:c0de 50693 typ host tcptype passive
H6e6ca682 1 TCP 2130706431 2607:fad8:4:6:9eb6:d0ff:dead:c0de 9 typ host tcptype active
H42c1b577 1 TCP 2130706431 fe80::9eb6:d0ff:fee7:1412 50693 typ host tcptype passive
H42c1b577 1 TCP 2130706431 fe80::9eb6:d0ff:fee7:1412 9 typ host tcptype active
Hc0a8007e 1 TCP 2130706431 192.168.0.123 42751 typ host tcptype passive
Hc0a8007e 1 TCP 2130706431 192.168.0.123 9 typ host tcptype active
Sc0a8007e 1 TCP 1694498815 X.X.X.X 42751 typ srflx tcptype passive
Z.Z.Z.Z:YYYY
A.A.A.A:YYYY
Where 0d04b932 is the ufrag and 7c33834e7cf944bf0e367b47 the password of the ICE session.
2130706431 and 1694498815 are the priority of the candidates.
192.168.0.126 42751 typ host tcptype passive is a passive host candidate and 1694498815 X.X.X.X 42751 typ srflx tcptype passive a passive host reflecting the public IP address (mapped via UPnP for example).
Vários dispositivos
Um utilizador pode vincular a sua conta a vários dispositivos. Assim, precisamos de implementar a transferência quando um utilizador envia um ficheiro para um contacto que tem vários dispositivos vinculados a esta conta.
Primeira abordagem
A primeira abordagem consistia em enviar um pedido através do DHT a todos os dispositivos e os primeiros dispositivos que respondessem receberiam o ficheiro a transferir. Isto é mau para o seu contacto porque ele não saberá qual o dispositivo que receberá a transferência.
Abordagem atual
Agora, continuamos a enviar um pedido a todos os dispositivos. A diferença é que todos os dispositivos terão a notificação de receção de um ficheiro e podem aceitar/recusar a transferência. A maior parte do código para isso está em data_transfer.cpp.
Agora (desde https://review.jami.net/c/jami-daemon/+/9327), quando um utilizador envia um ficheiro, irá pedir uma PeerConnection com todos os dispositivos pares. E para todas as ligações, anexamos um novo fluxo de entrada para podermos aceitar/recusar/cancelar cada transferência separadamente.
Em data_transfer.cpp definimos a classe OptimisticMetaOutgoingInfo que representa a visão otimista a mostrar ao cliente. É otimista porque se um contacto aceitar uma transferência num dispositivo e recusar noutros, esta classe mostrará a transferência de ficheiros em curso. E só apresentará um erro se todos os dispositivos recusarem a transferência.
Esta classe está ligada à SubOutgoingFileTransfer que representa o estado de uma transferência com um dispositivo. Mais tarde, os clientes terão a possibilidade de mostrar uma subtransferência em vez da otimista (ver lista de tarefas).
Utilizar outro servidor TURN
Actually the default TURN server is turn.jami.net. But you can host your own TURN server. For example by running a coTURN server.
sudo turnserver -a -v -n -u user:password -r "realm"
Em seguida, pode configurar o servidor TURN nas configurações avançadas da aplicação.
Nota
This needs some technical knowledge. Moreover, the TURN server should see the same IP address of your node as the destination node, or the peer connection will fail (because the authorization will be incorrect).
Lista de A FAZER
Usar libtorrent?
Mostrar o estado das subtransferências para ficheiros de saída